Some students learn best by doing, not watching or listening.Science experiments are a really fun way to develop vocabulary and introduce the scientific method to your English Second language students.An ESL student may not have an advanced English vocabulary, but with the right kind of curriculum and instruction, teachers may be surprised at the knowledge students can gain. Science lends itself well to developing ESL students' language and content knowledge because there are so many opportunities for hands-on learning and observation. Using sciencealready familiar to your students can both help your students feel a measure of success, they’ll talk more and feel comfortable doing so.
Introducing the scientific method:
The scientific method is a way for scientists to study and learn things. It doesn't matter what the scientist is trying to learn, using the scientific method can help them come up with an answer. The scientific method is the cornerstone to modern science. Without a formal method of determining questions and their answers, we wouldn't have science or the knowledge we have today.
The first thing to do with the scientific method is to come up with a question. Next you need to observe and gather information in order to come up with a guess (called a hypothesis) or a number of guesses to the answer. Now you run experiments to see if your guess is right. As you run experiments you can change your guess, or hypothesis, to fit your results. Finally, after running all the tests you can think of, you present your final answer.
Steps of the scientific method:
- Ask a question
- Gather information and observe (research)
- Make a hypothesis (guess the answer)
- Experiment and test your hypothesis
- Analyze your test results
- Present a conclusion
Learning Goals for students:
- Understand scientific inquiry through questioning, predicting, observing, recording and interpreting data, and communicating results
- Keep records of scientific investigations using graphic organizers
- Develop group work skills such as working together
- Develop English communicating skills such as listening, writing and speaking
Here are two easy examples of engaging science experiments and how to use it in the Extended English classroom. It will help your students to use the steps of the scientific method and learn valuable skills in communicating in English.
Lesson 1 :Making a Wind Vane:
Before Making a Wind Vane: Discuss the definition and causes of wind.Discuss the purpose of a wind vane as a tool for measuring wind direction. Discuss wind as a renewable energy source. Ask students if they have ever seen large wind turbines.Show pictures of wind turbines or wind farms. Explain to students that as the use of wind power continues to grow, new wind farms will be built. Wind farm owners will need to be aware of wind direction and speed in order to carefully locate future wind farms. Explain to students that we are going to build a simple tool or instrument to measure the direction of the wind.
What You Need:
- Paper drinking cup
- Glue & scissors
- Modeling clay
- Sharpened pencil with an eraser
- Drinking straw (a straight one)
- Straight pin
- Poster board
- Sheet of paper
- Ruler
- Black permanent marker
- Compass
What to Do:
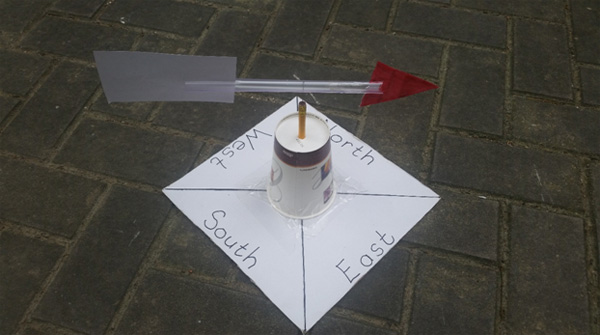
Use a ruler and the black permanent marker to connect the corners and divide it into four sides. Students should write the words for the four parts of the compass along the outer edge of each of the four sides. Moving from the top, clockwise, write “North, East, South, and West.”Stick a blob of modeling clay or putty in the cup and glue or tape the cup, upside down, onto the center of the poster board compass base you just made.
Take the sharpened pencil, and poke it through the center of the paper cup so that the eraser is on top, and the point is held by the modeling clay. Now, cut a broad triangle and a square about 7 centimeters across from your paper. Cut a slit in each end of the straw. Slide the triangle onto one end and the square onto the other. Use a bit of glue or tape if they seem to slip. Push the pin through the center of the straw and attach it to the top of the pencil eraser. If you flick the straw, or blow on either end, it should move freely.
|
| A Wind Vane |
Take your wind vane outside to a place where the wind is not highly obstructed. Help your students to find north, south, east, and west on a real compass, and line up the wind vane accordingly. Wait for the next breeze; the arrow will point to where it’s coming from.Students can place their wind vanes in a variety of different areas and conditions and try placing their wind vanes behind trees and other objects to see how the objects can affect wind conditions.

|
| Students use the wind vane |
After Using the Wind Vane:
Discuss the results of measuring the wind direction with the wind vane. Discuss why knowing wind direction could be important in the future for helping our environment. Keep a record of the wind direction on a wind rose worksheet and ask the students to present their results to the class. Let the students decide where the best place would be to put up a wind turbine on our school grounds.
Lesson 2: Sink or Float:
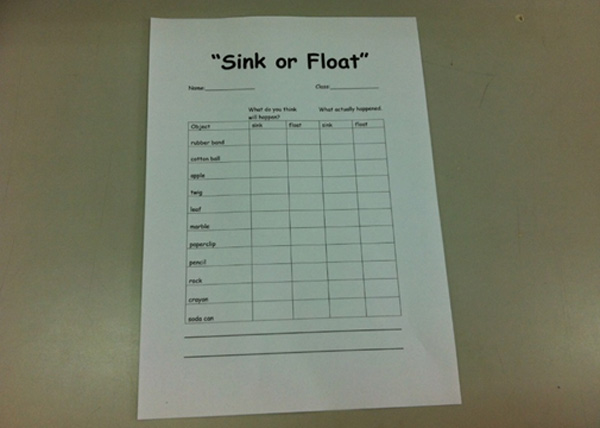
In this activity, students use everyday objects to make and test predictions about what sinks and what floats, charting their results on a worksheet.
What You Need:
- Floating and sinking objects such as a rubber band, a cotton ball, an orange or an apple,a small piece of wood,an eraser, a twig, a marble, a paperclip, a pencil, a rock, a crayon, floating toys, a soda can, a sponge, tennis ball, golf ball, ping pong ball, etc.
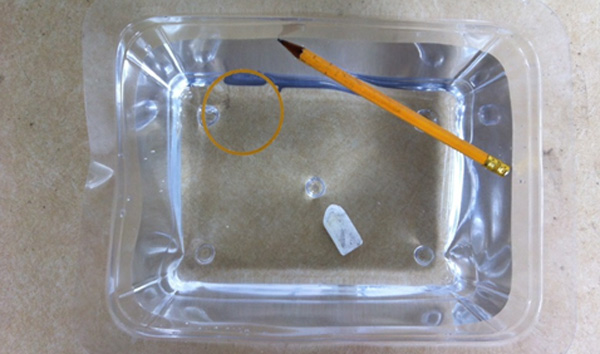
- A clear plastic container filled with water (students need to see inside the container.)
What to Do:
- Engage students. Introduce the study of sinking and floating by asking the students what they know about things that sink and float, and why some things sink and other things float.
- Explore which items sink and which objects float. In a large group, hold up an item so that all the students can see it, pass it around for students to feel, and ask them to predict if the item will sink or float. Ask students to write their prediction. Have one student (rotate role) place the object into the water.
|
| Sink or Float |
- Explain the results. As each item is tested, ask students to complete their worksheets.
|
| Worksheets for “Sink or Float" |
- After several items have been tested, ask students to think about what makes some things sink and others float.
- The students will say that heavy things sink and light things float.
- Introduce to them the term “density” instead of heavy and light.Whether an object sinks or floats depends on its density and the density of the liquid into which it is placed. If the object has a greater density than the liquid, it sinks. If it has less density, the object floats. Keep it simple.
Evaluating the students using the science experiments:
The teacher can evaluate the students by
- Students’ participation and engagement
- Using English to communicate with each other and with the teacher
- Students' ability to make, record and test predictions
|
